- 전체(91)
- html5(1)
- web accessibility(11)
- Cross Browsing(20)
- html basic(7)
- css basic(23)
- meta(2)
- form(12)
- table(2)
- menu(2)
- box(1)
- button(1)
- font(1)
- etc(8)
- CSS 애니메이션
2010.06.07 11:00:57
div 상하로 정렬 하기 (상단, 중앙, 하단)

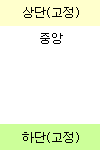
div가 상단, 중앙, 하단으로 있을 때 하단 div를 bottom으로 붙이는 방법
------------------------------------------------------------------------------------------
<style type="text/css">
#Box {position:relative; width:300px; height:300px;}
#head {float:left; width:300px; height:50px;}
#body {clear:left; float:left; width:300px;}
#foot {position:<X>absolute; clear:left; float:left; width:300px; height:50px; left:0; bottom:0px;}</X>
</style>
<div id="Box">
<div id="head">상단</div>
<div id="body">중앙<br />내용1<br />내용2</div>
<div id="foot">하단</div>
</div>
------------------------------------------------------------------------------------------
겉에 감싸는 div에 position을 relative로 주고
하단으로 붙이고 싶은 div의 position을 absolute로 주면 하단 div는 겉의 div안에서 움직이게 된다.
하단 div에 left:0과 bottom:0으로 주어야 하단으로 딱 붙게 된다.
===========================================================================================
div 가운데 정렬
테이블을 사용할 때는 td에 align을 center로 주면 그 안에 들어가는 내용이 딱딱 가운데 정렬이 됐었는데..
div를 가운데 정렬하려니 도통 안되는 것이다.
몇번의 검색과 이것 저것 찾다보니 알게 된 것이 margin:0 auto 를 사용하면 된다는 것.
align의 center가 되는 것은 block레벨이 아닌 것에만 적용이 된다고 한다.
div는 block 레벨이니 당연히 div 자체에는 align이 먹히지 않는 것..
------------------------------------------------------------------------------------------
<style type="text/css">
#BoxCenter {margin:0 auto; width:300px; height:100px; background-color:#33CCFF;}
</style>
<div id="BoxCenter">div 중앙 정렬</div>
------------------------------------------------------------------------------------------
===========================================================================================
body 레이어의 onresize 이벤트에서 처리 해주시면 됩니다..
간단하게 예제 올립니다.
스타일정의 - 레이어의 외곽선을 보이기 위해 정의 했습니다.
<style>
.Layer{
position:absolute;
BORDER-BOTTOM: 1px solid;
BORDER-LEFT: 1px solid;
BORDER-RIGHT: 1px solid;
BORDER-TOP: 1px solid;
FONT-FAMILY: "돋움"; FONT-SIZE: 20pt
}
</style>
자바스크립트 정의 - LayerBody 의 onresize 이벤트에서 처리 했습니다.
그리고 window.onload 이벤트에서 LayerBody의 Height를 변경하여 테스트 하였습니다.
<SCRIPT ID=clientEventHandlersJS LANGUAGE=javascript>
<!--
function LayerBody_onresize() {
//LayerLeft 의 height 를 변경된 LayerBody의 height의 값을 대입
document.getElementById("LayerLeft").style.height = document.getElementById("LayerBody").style.height;
//LayerRight 의 height 를 변경된 LayerBody의 height의 값을 대입
document.getElementById("LayerRight").style.height = document.getElementById("LayerBody").style.height;
//LayerBottom의 top 을 LayerBody의 (top + height)을 대입하여 LayerBody의
//끝부분에 위치하게 한다.
document.getElementById("LayerBottom").style.top = document.getElementById("LayerBody").offsetTop + document.getElementById("LayerBody").offsetHeight;
}
function window_onload() { //테스트를 위해 window객체의 onload 이벤트에서 LayerBody의 height를 1000px로 변경 하였다.
document.getElementById("LayerBody").style.height = "1000px";
}
//-->
</SCRIPT>
body 부분 정의
<body onload="return window_onload()">
<div id="LayerLeft" class=Layer style="width:133px; height:325px; z-index:1"></div>
<div id="LayerBody" class=Layer style="width:301px; height:325px; z-index:2; left: 145px; top: 15px;" onresize="return LayerBody_onresize()"></div>
<div id="LayerRight" class=Layer style="width:188px; height:325px; z-index:3; left: 448px;"></div>
<div id="LayerBottom" class=Layer style="width:629px; height:115px; z-index:4; left: 9px; top: 341px;"></div>
</body>
댓글 쓰기 권한이 없습니다.
| 11 | 웹접근성 | 2017.03.14 |
| 10 | 웹접근성 지침 | 2016.05.18 |
| 9 | Image Sprite 기법이란 무엇입니까? | 2013.08.02 |
| 8 | IR(Image Replacement) 기법이란 무엇입니까? | 2013.08.02 |
| 7 | CSS 박스 모델 | 2013.08.02 |
| 6 | div + layout (liquid layout) | 2010.06.08 |
| 5 | div는 무엇일까? 어떻게 사용해야 할까? | 2010.06.07 |
| 4 | DIV를 이용하여 페이지의 특정 부분만 인쇄하는 방법 | 2010.06.07 |
| > | div 정렬 | 2010.06.07 |
| 2 | DIV 스크롤바 & 속성 | 2010.04.05 |
| 1 | DIV와 CSS를 이용한 웹 표준코딩의 장점 | 2009.09.09 |